Why settle for plain text when you can send videos, images, GIFs, and files automatically? With just a bit of code, you can level up your WhatsApp communication and make every message feel more personal, engaging, and impactful.
This guide is for anyone, whether you’re a developer or just starting to explore APIs. We’ll walk you through how to send rich media content through WhatsApp using Wassenger, straight from your computer.
It’s easier than you think, and the results? Way more fun and way more effective. Let’s dive in and give your messages the upgrade they deserve.
🤩 🤖 Wassenger is a complete communication platform and API solution for WhatsApp. Explore more than 100+ API use cases and automate anything on WhatsApp by signing up for a free trial and get started in minutes!
In this tutorial, you will learn how to send multimedia messages to phone numbers and group chat lists using the API.
A media file can be any of the following: images (JPEG, PNG, WEBP), videos (MP4, 3GPP), audios (MP3, OGG, MP4, ACC), gifs (MP4) and documents (PDF, PPT, PPTX, DOCX, DOC, ZIP, RAR, other binary types).
If you need to send messages from code, you can use any programming language that can perform HTTPS requests to the API. Below you will find the live API tester with ready-to-use code examples in various programming languages.
Requirements
- To have a WhatsApp number already linked to the platform and online.
- Message recipient phone number with international prefix in E164 format. Example:
+12345678900. Validate the phone number format here.
API endpoints
In this tutorial we will use the following API endpoint:
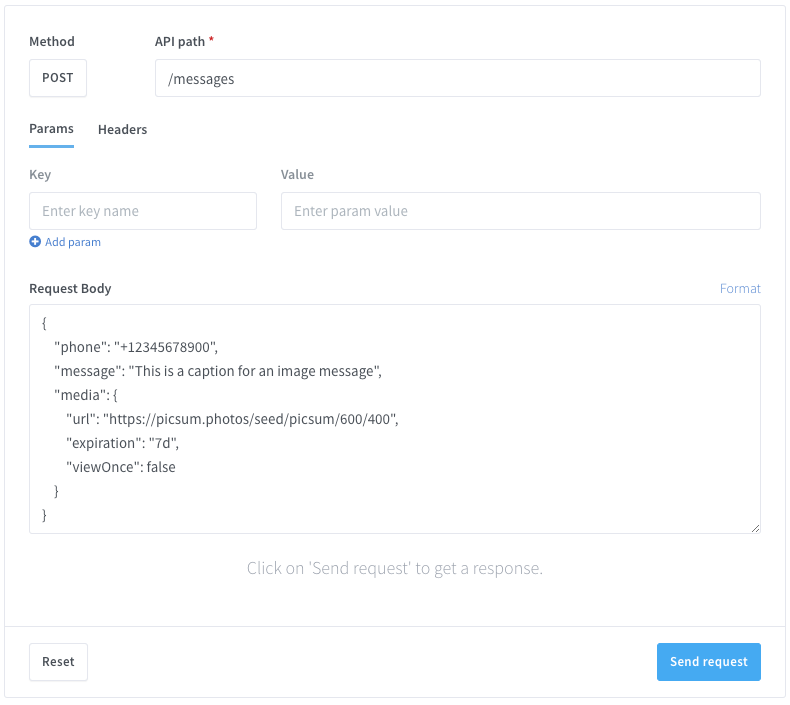
Breaking news! You can now send media messages in a single API request by passing the remote URL where the file is stored. Click here to test it
Upload the file
To send a file as a multimedia message, in this case, an image file, you should first upload the file to the platform.
You can upload the file by using the following methods using the API:
- Remote URL using JSON with an
urlfield with the publicly accessible URL to download the file (recommended). - Form data (
multipart/form-data) using thefilefield with the file content. - Raw binary data by uploading the file contents as a data stream with the proper file MIME type as Content-Type header, e.g:
image/jpeg,application/pdf.
In this tutorial, we will cover the first two methods of uploading files.
Uploading the file enables the system to validate and store the file just once, avoiding the upload and processing cost every time a media message is delivered, and therefore improving the message delivery speed and simplifying the API integration.
Note that the uploaded file will be stored in the platform for 90 days by default, therefore in many cases you should only upload the file once and that’s it. Optionally, you can also configure how much time the file should be stored in the platform by defining a custom expiration time, for more details check the API documentation. By default, your account has 10GB of files storage capacity in the cloud.
Upload file using a remote URL
You can upload any file to the platform by simply specifying the public URL from where to download the file.
In case the URL is not publicly accessible, it returns a non-valid HTTP status (>=400) or it returns non-binary content, such as HTML or text, the API will return an error.
Target API URL (POST)
https://api.wassenger.com/v1/files
Required HTTPS headers
Content-Type: application/json
Token: $API-TOKEN
Request body in JSON format
{
  "url": "https://picsum.photos/seed/picsum/600/400"
}
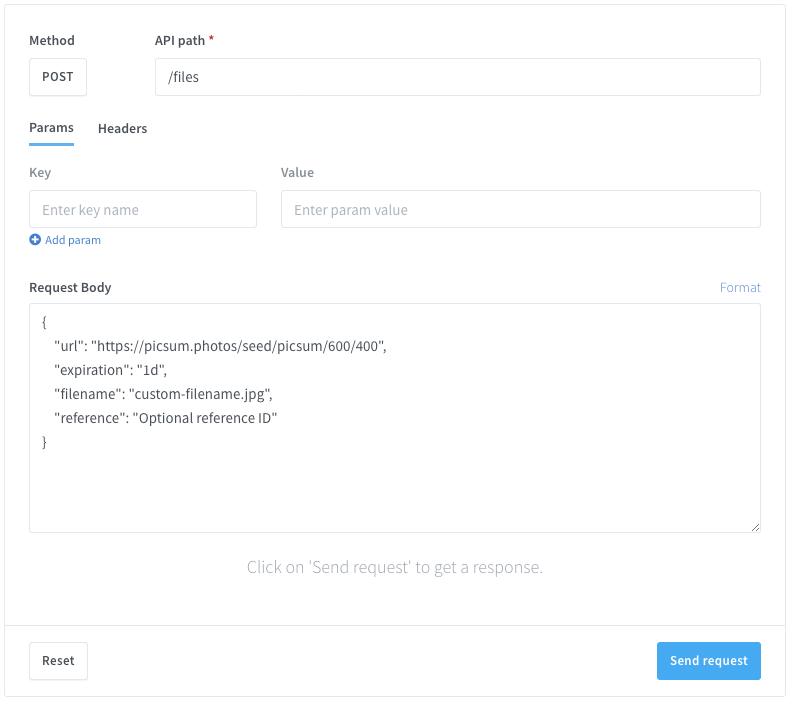
Alternatively, you can also specify optional fields when uploading the file, such as a custom file expiration time, reference identifier, or a custom filename.
{
  "url": "https://picsum.photos/seed/picsum/600/400",
  "expiration": "1d",
  "filename": "custom-filename.jpg",
  "reference": "Optional reference ID"
}
Get the file ID from the API response
If the file is properly uploaded into the platform, the API will return a valid response in JSON format like this:
[
  {
    "id": "[Redacted ID]",
    "format": "native",
    "filename": "sample.jpg",
    "size": 53697,
    "mime": "image/jpeg",
    "ext": "jpeg",
    "kind": "image",
    "sha2": "[Redacted Hash]",
    "tags": [],
    "status": "active",
    "mode": "default",
    "createdAt": "2021-05-08T22:49:50.954Z",
    "expiresAt": "2021-09-06T22:49:50.949Z"
  }
]
Important: From the response JSON you should obtain the id field with a value, for instance06248ed01a7a65946c0701, which represents the unique file ID that we will later use to send the file as a media message in a separate API request.
Upload file using multipart form data
You can upload any file to the platform using the traditional multipart form data mechanism widely used by web browsers to upload different types of content, including files, to a remote server.
Here you can learn more about how multipart form upload works.
Target API URL (POST)
https://api.wassenger.com/v1/files
Required HTTPS headers
Content-Type: multipart/form-data
Token: $API-TOKEN
Request body
Differently from the JSON-based upload, in this case, we need to rely on a more complex mechanism based on the HTTP client we are using that will help us compose the form fields according to the multipart specification.
Depending on the programming language or HTTP client software you are using, the process may vary. For the sake of simplicity, we are going highlight the most popular tools, such as Postman, and popular programming languages.
The core requirement is to define the file field in the form of data, otherwise, the API will return an error as this field is mandatory.
🤩 🤖 Wassenger is a complete communication platform and API solution for WhatsApp. Explore more than 100+ API use cases and automate anything on WhatsApp by signing up for a free trial and getting started in minutes**!**
Upload the file to your web browser
You can manually upload files easily into the platform from the web console without installing any software:
For automated file uploading, please see the alternative options below.
Upload file using cURL
cURL is a popular and useful command-line HTTP client.
You can easily upload files from the command line by using the following command, which path/to/image.jpg should represent the file path you want to upload from your local disk:
curl \
-F file=@path/to/image.jpg \
-H 'Token: $API-TOKEN' \
https://api.wassenger.com/v1/files
Upload file using Postman
Postman is a versatile and handy tool for HTTP testing and debugging.
Following this simple tutorial, you can upload files using Postman, replacing the target URL with the API.
Explore the Postman tutorial here
Upload file using code
Explore how to use the code in your browser without installing any software.
Also, you can find different languages you can test on Replit.com:
# Requires to install requests package:
# Run: pip install requests
import requests
# Customize the local path of the file to upload
filepath = '/path/to/image.jpg'
# API key required in order to authenticate the upload
apikey = '$API_KEY'
# Read file to upload
files = {'file': open(filepath, 'rb')}
# Upload file
response = requests.post('https://api.wassenger.com/v1/files', files=files)
if response.status_code >= 400:
print('Request failed with invalid status:', response.status_code)
else:
json = response.json()
file_id = json[0]['id']
print('File uploaded successfully with ID:', file_id)
// Customize the local path of the file to upload
$filepath = '/path/to/image.jpg';
// API key required in order to authenticate the upload
$apikey = '$API_KEY';
// Upload file
$upload = curl_init();
curl_setopt_array($upload, array(
CURLOPT_URL => 'https://api.wassenger.com/v1/files',
CURLOPT_HTTPHEADER => array(
"Token: $apikey"
),
CURLOPT_POSTFIELDS => array(
'file' => new CURLFile($filepath)
),
CURLOPT_POST => TRUE,
CURLOPT_SSL_VERIFYPEER => FALSE,
CURLOPT_SSL_VERIFYHOST => FALSE
);
$response = curl_exec($upload);
if(curl_errno($ch) {
echo("Request failed");
} else if(curl_getinfo($ch, CURLINFO_HTTP_CODE) >= 400) {
echo("Invalid request or unsupported file to upload");
} else {
$json = json_decode($response, true);
$file_id = $json[0]['id'];
echo("File uploaded successfully with ID: $file_id");
}
// Requires to install pecl_http package
// Run: pecl install pecl_http
// More information: https://pecl.php.net/package/pecl_http/3.2.0
$client = new http\Client;
$request = new http\Client\Request;
// Customize the local path of the file to upload
$filepath = '/path/to/image.jpg';
// API key required in order to authenticate the upload
$apikey = '$API_KEY';
// Prepare request
$body = new http\Message\Body;
$body->addForm(null, [
[
'name' => 'file',
'type' => null,
'file' => $filename,
'data' => null
]
]);
$request->setRequestUrl('https://api.wassenger.com/v1/files');
$request->setRequestMethod('POST');
$request->setBody($body);
$request->setQuery(new http\QueryString([
'reference' => 'optional-reference-id'
]));
$request->setHeaders([
'Token' => $apikey
]);
$client->enqueue($request)->send();
$response = $client->getResponse();
if($response->getResponseCode() >= 400) {
echo("Invalid request or unsupported file to upload");
} else {
$body = json_decode($response->getBody()->toString());
$file_id = $json[0]['id'];
echo("File uploaded successfully with ID: $file_id");
}
package main
import(
"net/http"
"os"
"bytes"
"path"
"path/filepath"
"mime/multipart"
"io"
"encoding/json"
)
// API key required in order to authenticate the upload
const apiKey = "$API_KEY"
func main() {
# Customize the local path of the file to upload
fileName:= "path/to/image.jpg"
fileDir, _:= os.Getwd()
filePath:= path.Join(fileDir, fileName)
file, _:= os.Open(filePath)
defer file.Close()
body:= &bytes.Buffer{}
writer:= multipart.NewWriter(body)
part, _:= writer.CreateFormFile("file", filepath.Base(file.Name()))
io.Copy(part, file)
writer.Close()
r, _:= http.NewRequest("POST", "https://api.wassenger.com/v1/files", body)
r.Header.Add("Token", apiKey)
r.Header.Add("Content-Type", writer.FormDataContentType())
client:= &http.Client{Timeout: 90 * time.Second}
response, err:= client.Do(r)
if err != nil {
fmt.Printf("Request failed with an error: %s", err.Error())
return
}
if(response.StatusCode >= 400) {
fmt.Printf("Request failed with response status: %d", response.StatusCode)
return
}
body:= []struct{
Id string `json:"id"`
}{}
defer response.Body.Close()
err:= json.NewDecoder(response.Body).Decode(&body)
if err != nil {
fmt.Printf("Failed to decode JSON: %s", err.Error())
return
}
fileId:= body[0].Id
fmt.Printf("File uploaded successfully with ID:", fileId)
}
RestClient restClient = new RestClient("https://api.wassenger.com");
RestRequest restRequest = new RestRequest("/v1/files");
restRequest.Method = Method.POST;
restRequest.AddHeader("Token", "$API_KEY");
restRequest.AddHeader("Content-Type", "multipart/form-data");
restRequest.AddFile("file", "/path/to/image.jpg");
var response = restClient.Execute(restRequest);
var json = JsonConvert.DeserializeObject(response.Content);
var fileId =(string)json[0]["id"];
Console.WriteLine("File uploaded successfully with ID: {0}", fileId);
require 'net/http/post/multipart'
url = URI.parse('https://api.wassenger.com/v1/files')
File.open("/path/to/image.jpg") do |image|
req = Net::HTTP::Post::Multipart.new url.path, "file" => UploadIO.new(image, "image/jpeg", "image.jpg")
req['Token'] = "API_KEY"
res = Net::HTTP.start(url.host, url.port) do |http|
http.request(req)
end
end
List<File> = Unirest.post("https://api.wassenger.com/v1/files")
.header("Token", "API_KEY")
.field("file", new File("/path/to/image.jpg"))
.getBody()
🤩 🤖 Wassenger is a complete communication platform and API solution for WhatsApp. Explore more than 100+ API use cases and automate anything on WhatsApp by signing up for a free trial and getting started in minutes!
Live testing the file upload using the API
Send media messages to a phone number
Sending a new media message via API is easy, you simply need to know the target phone number in E164 format and the uploaded file ID (24 characters hexadecimal) that you can obtain from the uploaded files listing here or from the list of uploaded files via the API.
You can send messages to any phone number worldwide that has a WhatsApp account, there is no need to add a phone number as a contact in your mobile device agenda.
Prepare the request
Target API URL (POST)
https://api.wassenger.com/v1/messages
Required HTTPS headers
Content-Type: application/json
Token: $API_KEY
Request body in JSON format
{
  "phone": "+12345678900",
  "message": "This is a media message example 😀",
  "media": {
    "file": "UPLOADED FILE ID GOES HERE"
  }
}
You can now send the media message via API.
Send media messages to a group
Very Similar to the previous scenario, you can also send media messages to group chats.
To send messages to a group, you must be a participant of it with send message permissions. If you are the administrator of the group you will have full permissions to send messages.
Prepare the request
Target API URL (POST)
https://api.wassenger.com/v1/messages
Required HTTPS headers
Content-Type: application/json
Token: $API_KEY
Request body in JSON format
Sending a message to a group chat:
{
  "group": "120363163556487865@g.us",
  "message": "This is a media message example sent a group 😀",
  "media": {
    "file": "UPLOADED FILE ID GOES HERE"
  }
}
Live test sends media messages using the API
You can now play, debug and live test the API directly from your browser, explore and try more API examples and get in one click ready-to-use code snippets available in 15+ different programming languages 😎
🤩 🤖 Wassenger is a complete communication platform and API solution for WhatsApp. Explore more than 100+ API use cases and automate anything on WhatsApp by signing up for a free trial and getting started in minutes!
FAQs
What type of media files can be sent?
You can send images (JPEG, PNG, WEBP), videos (MP4, 3GPP), audios (MP3, OGG, MP4, ACC), gifs (MP4) and documents (PDF, PPT, PPTX, DOCX, DOC, ZIP, RAR, other binary types).
Check out the API documentation for more details.
How to send messages to multiple phone numbers
You just have to send multiple API requests, one per target phone number.
For instance, if you want to send a message to 10 phone numbers, you should send 10 independent HTTPS requests to the API.
There is no option to send multiple messages in a single API request.
How to validate if a phone number can receive WhatsApp messages
You can validate if a given phone number is linked to a WhatsApp account and can receive messages.
The API provides an endpoint that can validate whether a given phone number exists in WhatsApp or not.
The only requirement is to have at least one WhatsApp number connected to the platform in your current account.
For more details, please check out the API endpoint documentation here.
Before you check if a phone number exists on WhatsApp, you can also validate and normalize the format of a list of phone numbers by using the numbers validator API endpoint. This endpoint only validates the correct E164 format, but it does not check whether the phone number effectively exists on WhatsApp.
Note: The number of WhatsApp check validations is limited per month based on your subscription plan. Please check out the pricing table for more details about the limits.
Looking for more answers? Check out the extended FAQs.
Further useful resources
API Documentation
For more details about the endpoint API, please check the documentation where you will find all the details about the accepted request params, possible success or error responses and ready-to-use code examples in multiple programming languages: