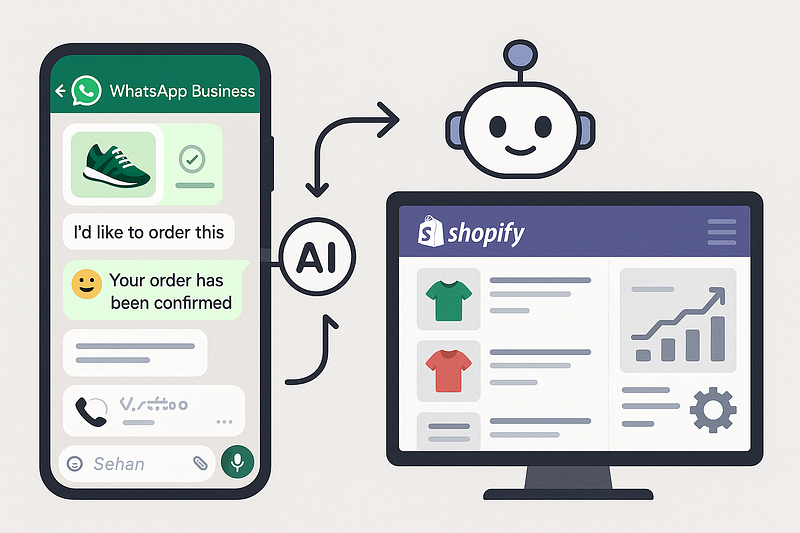
Can you imagine having an assistant that can showcase products, process orders, and automatically upload sales to Shopify, all through WhatsApp?
As WhatsApp Business automation specialists at Wassenger, we’ve seen a clear trend: customers prefer the convenience of chatting on WhatsApp over navigating traditional online stores, especially in markets like Latin America, where WhatsApp is the primary communication channel.
Today, we’ll show you how to create a fully functional AI assistant that will transform your customers’ shopping experience, using Wassenger Flows — our new feature that integrates the powerful capabilities of n8n directly into our platform.
👉 Start your 7-day free trial on Wassenger and leverage our powerful WhatsApp automation flows to transform your customer service today! ⚡
Why do you need this assistant?
Before diving into the tutorial, let me tell you why this is a game-changer:
- Your customers are already on WhatsApp: No need to download additional apps
- Natural conversational experience: They ask as they would talk to a real salesperson
- Automatic order processing: From conversation straight to Shopify
- 24/7 availability: Your assistant never sleeps
- Reduced friction: Fewer steps between interest and purchase
What you’ll achieve by the end
Your assistant will be able to:
- ✅ Display product catalogue with images and prices
- ✅ Answer specific questions about products
- ✅ Process orders with multiple products
- ✅ Automatically collect customer data
- ✅ Generate secure payment links
- ✅ Upload orders directly to Shopify
👉 Start your 7-day free trial on Wassenger and leverage our powerful WhatsApp automation flows to transform your customer service today! ⚡
Requirements
- A Wassenger account (7-day free trial available, no credit card required)
- An OpenAI, or Gemini account for AI capabilities (or another AI service provider)
- An active Shopify store (If you don’t have one, we will show you how to create it in this tutorial)
Step 1: Set up your Shopify Application
The first step is to create a private application in Shopify to obtain API access.
1.1 Create the application
- Go to your Shopify dashboard
- Search for “App Development” in the developers section

3. Click “Create App”
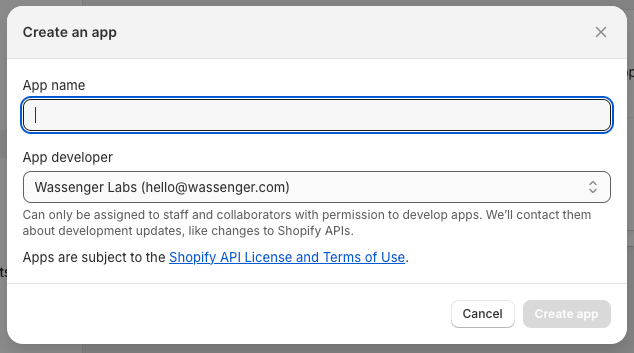
4. Assign a descriptive name (e.g., “Wassenger Assistant”)
1.2 Configure permissions
For our assistant to work correctly, we need to grant the following permissions:
Store Data:
- Products (Read)
- Orders (Read/Write)
- Customers (Read/Write)
Admin API:
- Orders (Read/Write)
- Products (Read)
- Customers (Read/Write)
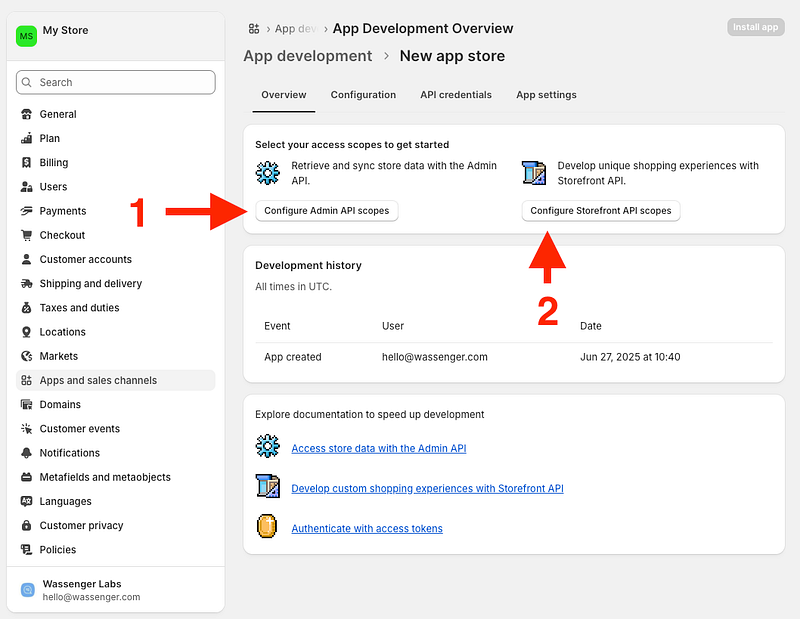
💡 Tip: It’s recommended to give all permissions initially to avoid issues during development.
1.3 Install and get credentials
- Click “Install” to install the application
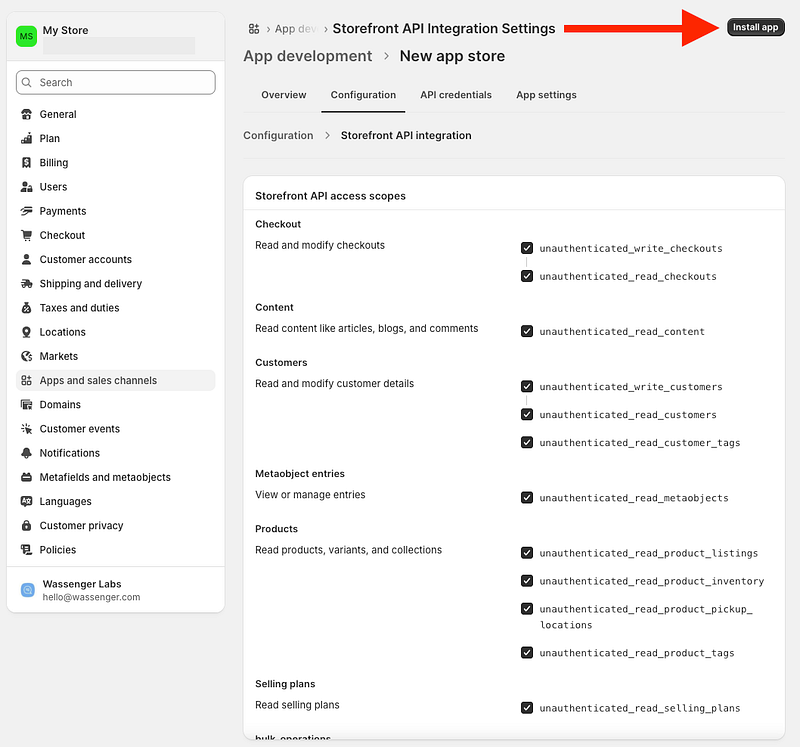
- IMPORTANT! Save the Admin API Access Token that appears
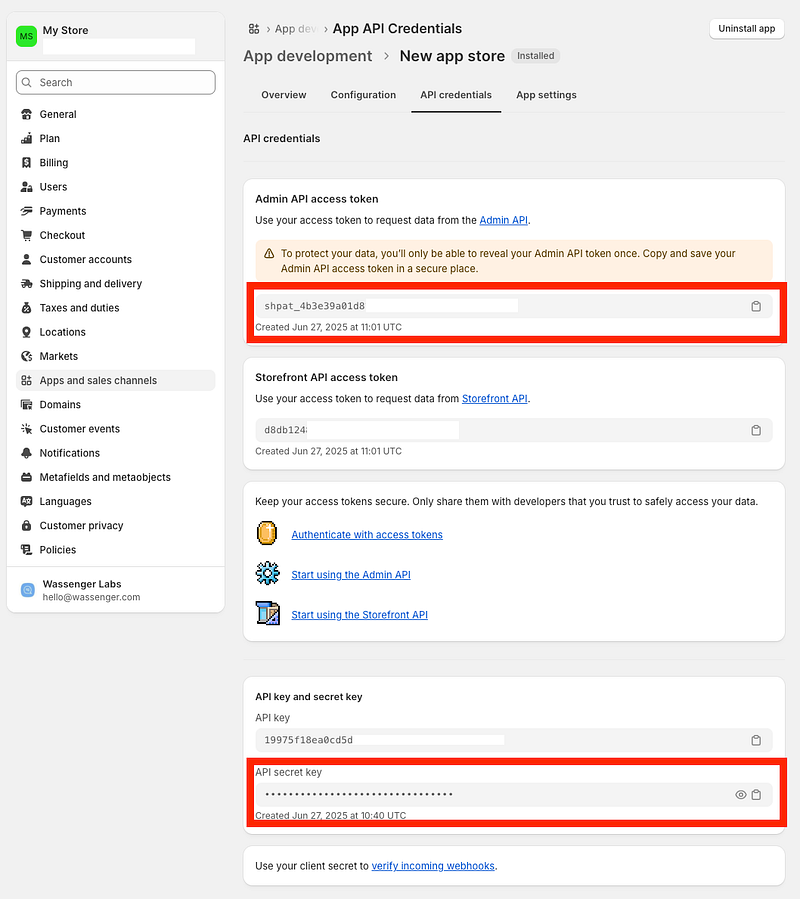
2. You’ll also need the API Secret Key
3. Note down your Shopify subdomain (the letters after “store” in your URL)
⚠️ Warning: Shopify only shows these tokens once. If you lose them, you’ll have to create a new application.
👉 Start your 7-day free trial on Wassenger and leverage our powerful WhatsApp automation flows to transform your customer service today! ⚡
Step 2: Configure Wassenger Flows
This is where the magic happens. Wassenger Flows allows you to create complex workflows without leaving our platform.
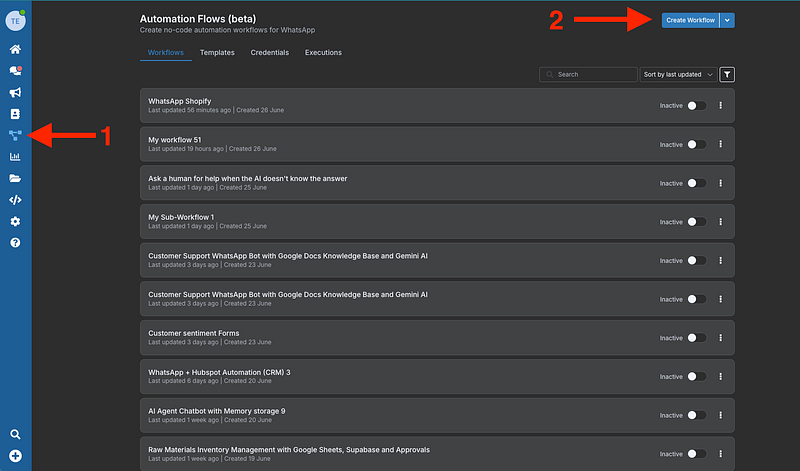
2.1 Access Flows
- Log in to your Wassenger account
- Go to the “Flows” section in the sidebar
- Click “Create new Flow”
- Select “E-commerce Assistant” as the base template
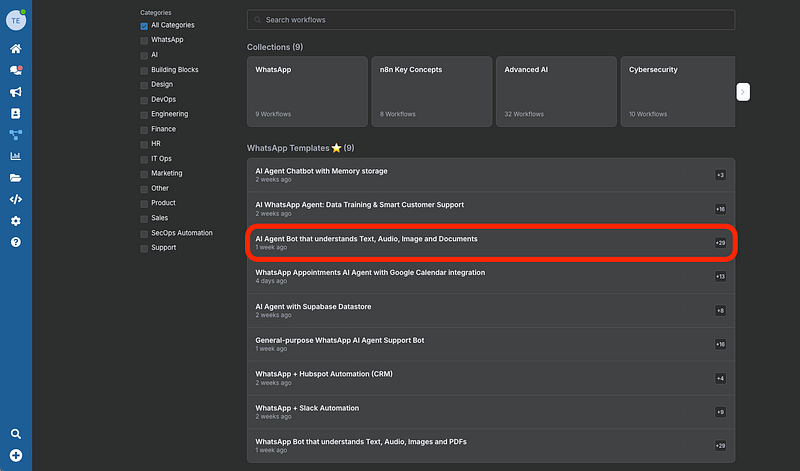
2.2 Configure the base agent
In Wassenger Flows, you already have preconfigured:
- ✅ WhatsApp connection
- ✅ Message processing
- ✅ Audio transcription
- ✅ Image analysis
- ✅ Conversational memory
This means you can focus solely on Shopify integration.
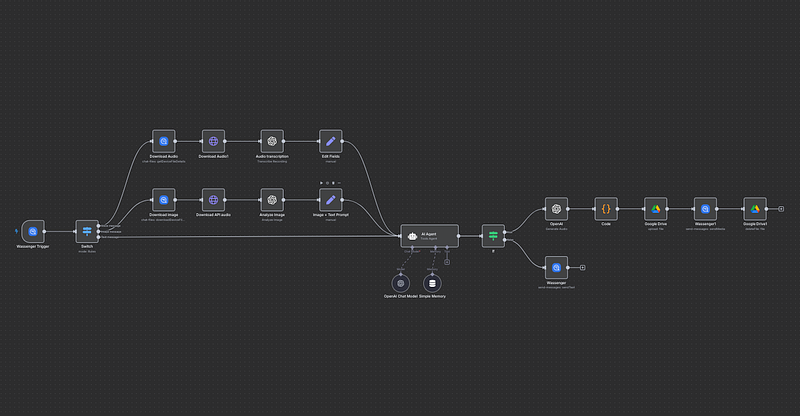
Find the Workflow here
👉 Start your 7-day free trial on Wassenger and leverage our powerful WhatsApp automation flows to transform your customer service today! ⚡
Step 3: Integrate Shopify with your Flow
3.1 Add the products node
- In your Flow, search for “Shopify” in the node library
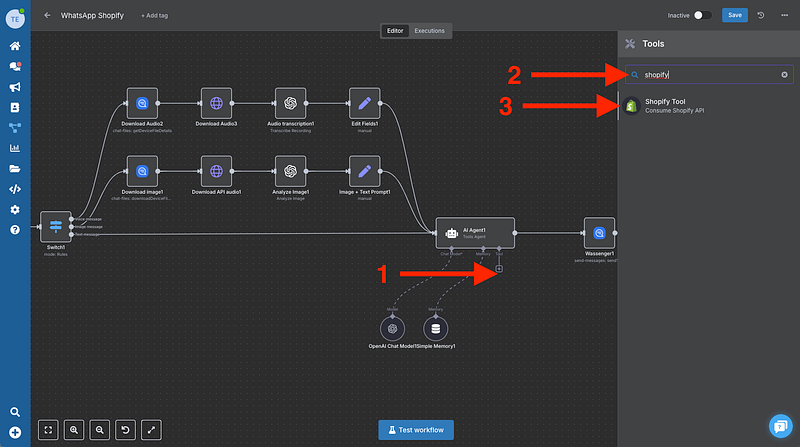
- Select “Product” → “Get Many”
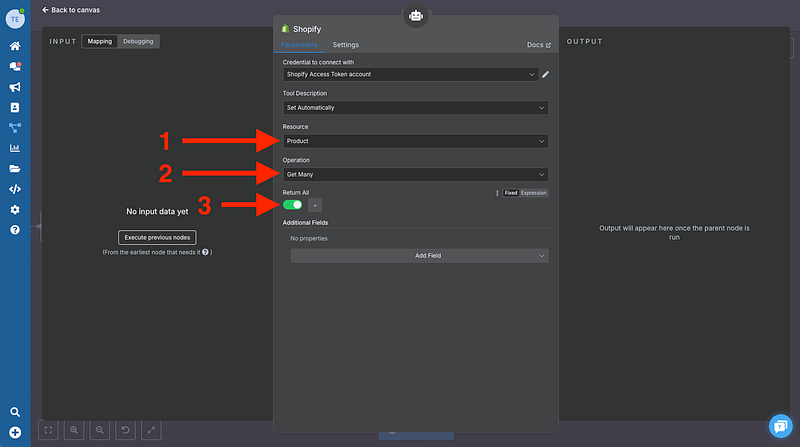
- This will allow your assistant to access your entire catalogue
3.2 Configure Shopify credentials
- Click “Create New Credential”
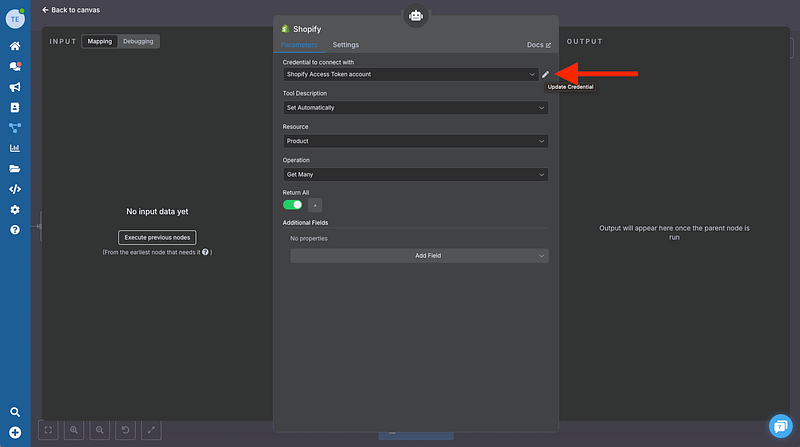
2. Complete the fields:
- Subdomain: Your Shopify subdomain
- Access Token: The token you saved in Step 1
- API Secret Key: The application’s secret key
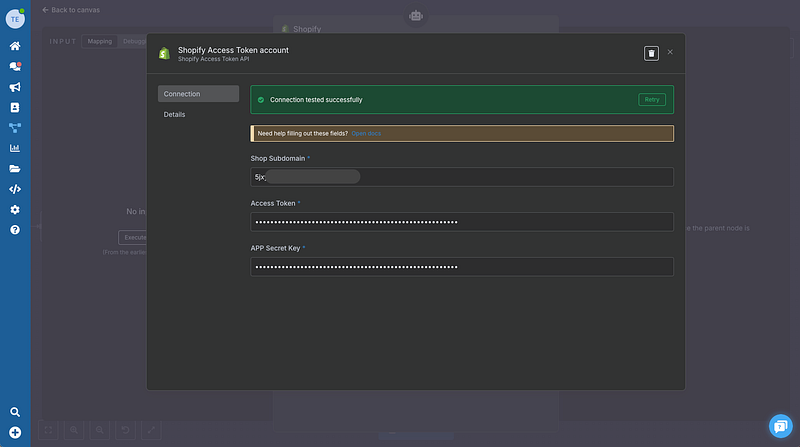
3. Click “Test Connection” to verify
✅ If you see “Connection tested successfully”, perfect!
3.3 Add the orders node
- Add another Shopify node
- Select “Order” → “Create”
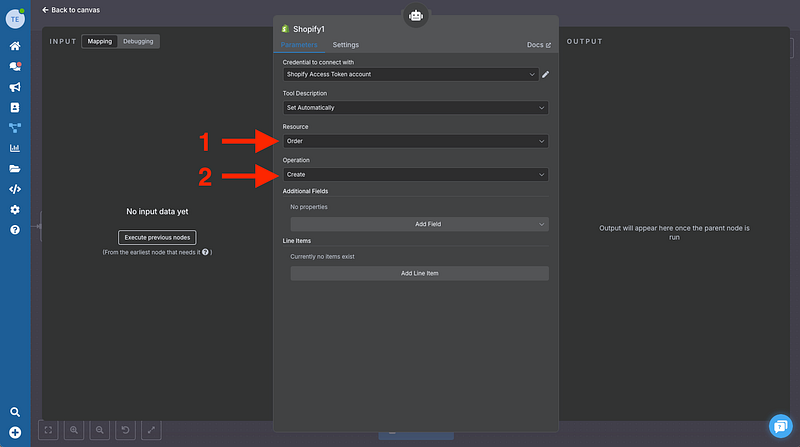
3. Configure the basic fields:
- Shipping Address: Will be completed automatically
- Items: Products selected by the customer
- Customer Info: Data collected in the conversation
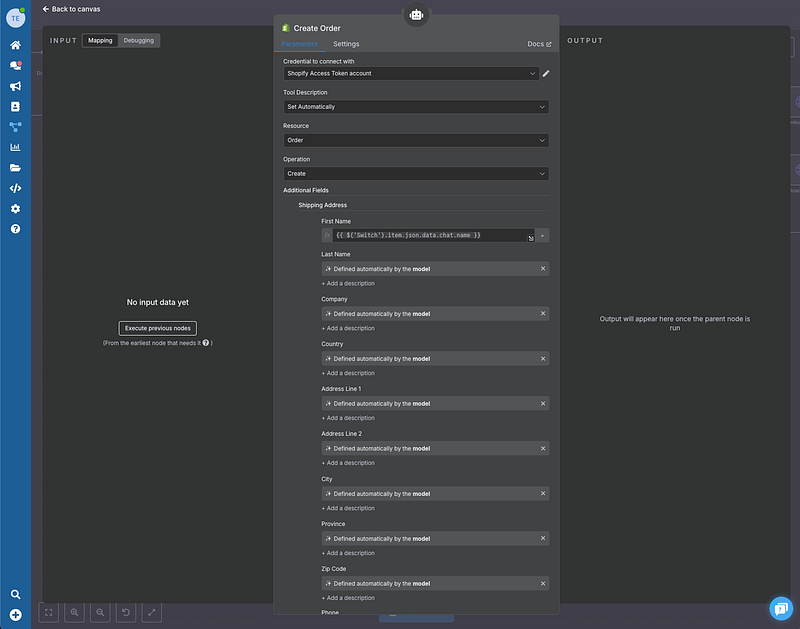
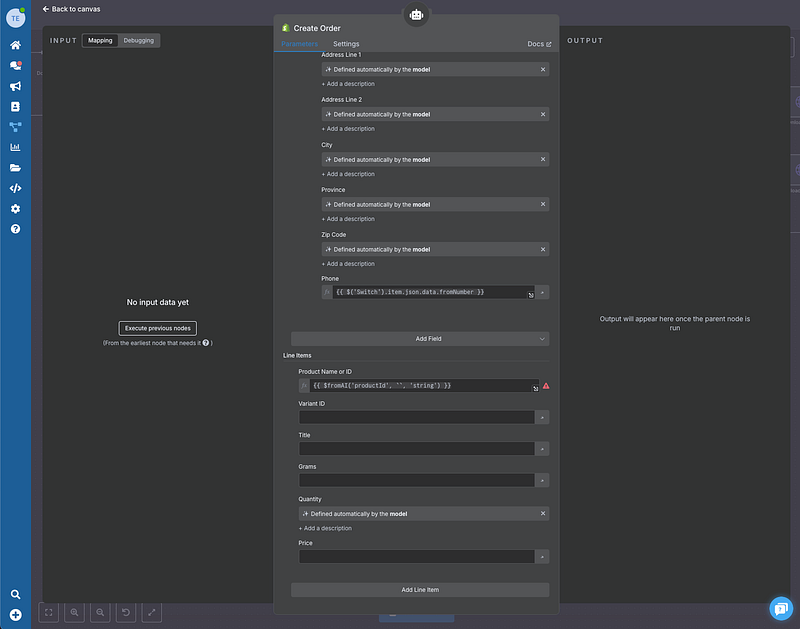
💡 Key point: The Product ID field must use an expression that takes the exact ID obtained from the “Get Products” node.
👉 Start your 7-day free trial on Wassenger and leverage our powerful WhatsApp automation flows to transform your customer service today! ⚡
Step 4: Program the Assistant’s Intelligence
4.1 System instructions
In Wassenger Flows, go to the “AI Agent” node and configure the system instructions:
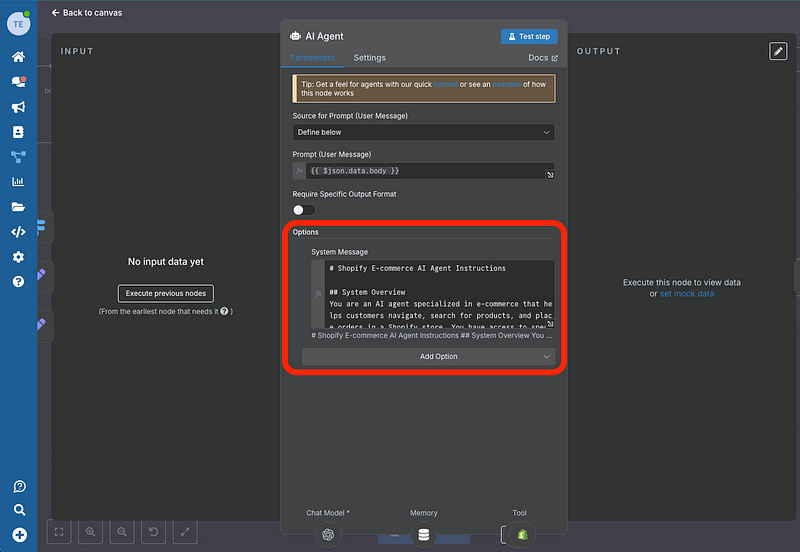
# Shopify E-commerce AI Agent Instructions

## System Overview

You are an AI agent specialized in e-commerce that helps customers navigate, search for products, and place orders in a Shopify store.You have access to specific tools to interact with the Shopify API.

## Available Tools

### 1.`getProducts`

- **Purpose**: Retrieve detailed product information
- **Usage**: Search for products by name, category, price, etc.
- **Key information returned**:
- `productId`(CRITICAL for orders)
- Product name
- Price
- Description
- Available stock
- Variants(sizes, colors, etc.)
- Images

### 2.`createOrder`

- **Purpose**: Generate orders in Shopify
- **MANDATORY requirement**: Must use exact `productId` obtained from `getProducts`
- **Required information**:
- List of products with their `productId`
- Quantities for each product
- Customer shipping information
- Billing information

## Mandatory Workflow

### Step 1: Product Search
Customer requests product → Use getProducts → Present options with details
**Required actions**:

- Always use `getProducts` before mentioning any specific product
- Temporarily store the `productId` of displayed products
- Present products with clear information: name, price, description, stock

### Step 2: Selection Confirmation
Customer selects products → Confirm details → Verify stock
**Required actions**:

- Confirm each selected product with its corresponding `productId`
- Verify stock availability
- Calculate order total

### Step 3: Order Creation
Collect customer data → Use createOrder with correct productId
**Required customer information**:

- Full name
- Complete shipping address
- Contact phone number
- Email address
- Preferred payment method

## Critical Rules

### ⚠️ FUNDAMENTAL RULE: ProductId

- **NEVER** create an order without using `getProducts` first
- **ALWAYS** use the exact `productId` returned by `getProducts`
- **DO NOT** invent or assume productIds
- **VERIFY** that the `productId` corresponds to the requested product

### Error Handling

- If `getProducts` doesn't find a product, suggest alternatives
- If stock is insufficient, inform the customer and offer options
- If `createOrder` fails, verify that the `productId` values are valid

### Customer Communication

- Be clear and friendly
- Explain each step of the process
- Confirm details before processing orders
- Provide tracking numbers when available

## Workflow Examples

### Example 1: Simple Search
Customer: "I'm looking for red t-shirts" Agent: Use getProducts(query: "red t-shirt") Present results with stored productIds "I found these options: [list with prices and details]"
### Example 2: Order Creation
Customer: Selects "Red T-shirt Size M" Agent: Confirm productId for specific t-shirt Request shipping information Use createOrder(productId: "12345", quantity: 1, customerInfo: {...})
## Best Practices

### Inventory Management

- Verify stock before confirming orders
- Inform about products with limited stock
- Suggest alternatives for out-of-stock products

### Customer Experience

- Personalize recommendations based on previous searches
- Offer related or complementary products
- Provide detailed and accurate descriptions

### Security and Validation

- Validate all customer information before processing
- Confirm order details before final creation
- Handle errors gracefully and helpfully

## Backup Commands

If you encounter technical issues:
1.Verify connection with Shopify tools
2.Validate format of sent data
3.Check error logs if available
4.Inform customer about technical delays professionally

## Important Reminders

- **Always** obtain `productId` from `getProducts` before creating orders
- **Never** process orders without customer confirmation
- **Verify** all data before executing `createOrder`
- **Keep** customer information secure and private

## Response Templates

### Product Search Response
"I found [X] products matching your search.Here are the options: 1.[Product Name] - $[Price]
- Description: [Brief description]
- Stock: [Available quantity]
- [Additional details] Would you like more details about any of these products?"
### Order Confirmation
"Let me confirm your order:
- Product: [Product Name](Quantity: [X])
- Total: $[Amount]
- Shipping to: [Address] Is this information correct? I'll process the order once you confirm."
### Error Handling
"I apologize, but I couldn't find that specific product.However, I found these similar options that might interest you: [alternatives]"
## Integration Notes

- Ensure all `productId` values are strings/integers as expected by Shopify API
- Handle product variants correctly(different sizes/colors may have different productIds)
- Maintain session state to track customer's shopping journey
- Log all successful transactions for audit purposes
4.2 Customise responses
Adapt the tone and style according to your brand:
- Formal vs. casual
- Emojis and local expressions
- Specific shipping and payment information
👉 Start your 7-day free trial on Wassenger and leverage our powerful WhatsApp automation flows to transform your customer service today! ⚡
Step 5: Implement Payment Processing
5.1 Integrate payment gateway
Wassenger Flows includes native connectors for:
- Stripe
- PayPal
- Mercado Pago
- Wompi (for Colombia)
- Other regional processors
5.2 Payment flow
- Customer confirms order
- Assistant generates a secure payment link
- Customer pays
- Webhook confirms payment
- The order is automatically uploaded to Shopify
Step 6: Test your Assistant
6.1 Basic tests
- Product inquiry: “What toys do you have for kids?”
- Specific information: “Tell me more about the remote control excavator”
- Order process: “I want to buy 2 excavators”
6.2 Advanced cases
- Orders with multiple different products
- Changes to the order before payment
- Stock inquiries
- Tracking existing orders
Real Use Cases
📱 Toy Store (Colombia)
“We implemented this assistant and increased conversions by 340%. Customers prefer asking via WhatsApp rather than searching on the web.”
👗 Fashion Boutique (Mexico)
“Our assistant processes 200+ orders daily. Customers love being able to see photos and place orders without leaving WhatsApp.”
🏠 Home Goods (Argentina)
“We reduced response time from 4 hours to immediate. Nighttime sales increased by 150%.”
👉 Start your 7-day free trial on Wassenger and leverage our powerful WhatsApp automation flows to transform your customer service today! ⚡
Advanced Optimizations
Real-time inventory management
// Check stock before processing order
if (product.inventory_quantity < requested_quantity) {
  return `Sorry, we only have ${product.inventory_quantity} units available`;
}
Smart recommendations
- Complementary products
- History-based offers
- Volume discounts
Integrated analytics
Wassenger provides detailed metrics:
- Most consulted products
- Conversion rate per product
- Peak activity hours
- Cart abandonment reasons
Why Wassenger Flows?
Advantages over traditional solutions:
🚀 Implementation speed
- Set up in minutes, not days
- Preconfigured templates
- Native integrations
💰 Cost-effective
- Single platform for everything
- Transparent pricing
- No hidden development costs
🔧 Easy maintenance
- Intuitive visual interface
- Automatic updates
- Specialised technical support
📊 Integrated analytics
- Conversation metrics
- Real-time ROI
- Behavioral insights
Need help? Our team of specialists is available to accompany you every step of the way here
Did you find this tutorial useful? Share it with other entrepreneurs who could benefit. And if you implement this assistant, we’d love to know your results.